滑块验证码自动拖拽(selenium+opencv)

计算需要移动的像素

首先我在github上找到了一个大佬写的项目SlideCrack/slide_01 at master · crazyxw/SlideCrack (github.com)

输入是本地的两张图:滑块验证码背景和滑块图片

输出是两个缺口的像素距离

1
2
3
4
5
6
7
8
9
10
11
12
13
14
15
16
17
18
19
20
21
22
23
24
25
26
27
28
29
30
31
32
33
34
35
36
37
38
39
40
41
42
43
44
45
46
47
48
49
50
51
52
53
54
55
56
57
58
59
60
61
62
63
64
65
66
67
68
69
70
71
72
73
74
75
76
77
78
79
80
81
82
83
import cv2
class SlideCrack(object):# https://github.com/crazyxw/SlideCrack/tree/master/slide_01
def __init__(self, gap, bg, out):
"""
init code
:param gap: 缺口图片
:param bg: 背景图片
:param out: 输出图片
"""
self.gap = gap
self.bg = bg
self.out = out

@staticmethod
def clear_white(img):
# 清除图片的空白区域,这里主要清除滑块的空白
img = cv2.imread(img)
rows, cols, channel = img.shape
min_x = 255
min_y = 255
max_x = 0
max_y = 0
for x in range(1, rows):
for y in range(1, cols):
t = set(img[x, y])
if len(t) >= 2:
if x <= min_x:
min_x = x
elif x >= max_x:
max_x = x

if y <= min_y:
min_y = y
elif y >= max_y:
max_y = y
img1 = img[min_x:max_x, min_y: max_y]
return img1

def template_match(self, tpl, target):
th, tw = tpl.shape[:2]
result = cv2.matchTemplate(target, tpl, cv2.TM_CCOEFF_NORMED)
# 寻找矩阵(一维数组当作向量,用Mat定义) 中最小值和最大值的位置
min_val, max_val, min_loc, max_loc = cv2.minMaxLoc(result)
tl = max_loc
br = (tl[0] + tw, tl[1] + th)
# 绘制矩形边框,将匹配区域标注出来
# target:目标图像
# tl:矩形定点
# br:矩形的宽高
# (0,0,255):矩形边框颜色
# 1:矩形边框大小
cv2.rectangle(target, tl, br, (0, 0, 255), 2)
cv2.imwrite(self.out, target)
return tl[0]

@staticmethod
def image_edge_detection(img):
edges = cv2.Canny(img, 100, 200)
return edges

def discern(self):
img1 = self.clear_white(self.gap)
img1 = cv2.cvtColor(img1, cv2.COLOR_RGB2GRAY)
slide = self.image_edge_detection(img1)

back = cv2.imread(self.bg, 0)
back = self.image_edge_detection(back)

slide_pic = cv2.cvtColor(slide, cv2.COLOR_GRAY2RGB)
back_pic = cv2.cvtColor(back, cv2.COLOR_GRAY2RGB)
x = self.template_match(slide_pic, back_pic)
# 输出横坐标, 即 滑块在图片上的位置
print(x)
return x

# 滑块图片
img1 = "1.png"
# 背景图片
img2 = "2.jpg"
# 处理结果图片,用红线标注
img3 = "3.png"
sc = SlideCrack(img1, img2, img3)
x=sc.discern()

浏览器自动控制

针对这个网页,分为三步,打开网址,点击按钮,拖拽滑块

操作网页元素

可以用css选择器来获取网页元素对象

1
2
3
driver.find_element_by_css_selector('.yidun_slider')
driver.find_element_by_css_selector('[captcha-mode=embed]').click()
driver.find_element_by_css_selector('.yidun_jigsaw').get_attribute('src')

用这个方法就可以得到图片的src属性,也就是url地址

下一步就是把图片下载下来

下载图片

使用urllib.request即可

1
2
3
4
5
6
7
8
9
import urllib.request
def downloadPic(url,filename):
try:
#下载图片,并保存到文件夹中
urllib.request.urlretrieve(url=url,filename=filename)
except IOError as e:
print("IOError")
except Exception as e:
print("Exception")

模拟拖拽

使用ActionChains(driver).drag_and_drop_by_offset(source,xoffset,yoffset).perform()

三个参数分别是元素对象,横向偏移,纵向盘偏移,比如下面这段代码,意思就是找到类名为yidun_slider的元素,向右拖动50像素

1
2
tag=driver.find_element_by_css_selector('.yidun_slider')
ActionChains(driver).drag_and_drop_by_offset(tag,50,0).perform()

整合

然后就可以用别人写好的代码了,实际操作时发现计算出的距离偏小一点点,拖拽参数里手动加一点点就行

但是!

这个网站好像识别出来是selenium在控制浏览器,就算拖拽的位置非常准确,也不会通过

我以为是检测到拖拽太准太快了,然后我就手动拖拽,居然也不行

初步得出的结论是只要是用selenium打开的这个网页,打开后即使手动操作也不可能成功

其他网站可能没有这种限制,没有测试

关于selenium怎么不被网站检测到,值得研究。

1
2
3
4
5
6
7
8
9
10
11
12
13
14
15
16
17
18
19
20
21
22
23
24
25
26
27
28
29
30
31
32
33
34
35
36
37
38
39
40
41
42
43
44
45
46
47
48
49
50
51
52
53
54
55
56
57
58
59
60
61
62
63
64
65
66
67
68
69
70
71
72
73
74
75
76
77
78
79
80
81
82
83
84
85
86
87
88
89
90
91
92
93
94
95
96
97
98
99
100
101
102
103
104
105
106
107
108
109
110
111
112
113
114
# -*- coding: utf-8 -*-
import urllib.request
def downloadPic(url,filename):
try:
#下载图片,并保存到文件夹中
urllib.request.urlretrieve(url=url,filename=filename)
except IOError as e:
print("IOError")
except Exception as e:
print("Exception")

import cv2
class SlideCrack(object):# https://github.com/crazyxw/SlideCrack/tree/master/slide_01
def __init__(self, gap, bg, out):
"""
init code
:param gap: 缺口图片
:param bg: 背景图片
:param out: 输出图片
"""
self.gap = gap
self.bg = bg
self.out = out

@staticmethod
def clear_white(img):
# 清除图片的空白区域,这里主要清除滑块的空白
img = cv2.imread(img)
rows, cols, channel = img.shape
min_x = 255
min_y = 255
max_x = 0
max_y = 0
for x in range(1, rows):
for y in range(1, cols):
t = set(img[x, y])
if len(t) >= 2:
if x <= min_x:
min_x = x
elif x >= max_x:
max_x = x

if y <= min_y:
min_y = y
elif y >= max_y:
max_y = y
img1 = img[min_x:max_x, min_y: max_y]
return img1

def template_match(self, tpl, target):
th, tw = tpl.shape[:2]
result = cv2.matchTemplate(target, tpl, cv2.TM_CCOEFF_NORMED)
# 寻找矩阵(一维数组当作向量,用Mat定义) 中最小值和最大值的位置
min_val, max_val, min_loc, max_loc = cv2.minMaxLoc(result)
tl = max_loc
br = (tl[0] + tw, tl[1] + th)
# 绘制矩形边框,将匹配区域标注出来
# target:目标图像
# tl:矩形定点
# br:矩形的宽高
# (0,0,255):矩形边框颜色
# 1:矩形边框大小
cv2.rectangle(target, tl, br, (0, 0, 255), 2)
cv2.imwrite(self.out, target)
return tl[0]

@staticmethod
def image_edge_detection(img):
edges = cv2.Canny(img, 100, 200)
return edges

def discern(self):
img1 = self.clear_white(self.gap)
img1 = cv2.cvtColor(img1, cv2.COLOR_RGB2GRAY)
slide = self.image_edge_detection(img1)

back = cv2.imread(self.bg, 0)
back = self.image_edge_detection(back)

slide_pic = cv2.cvtColor(slide, cv2.COLOR_GRAY2RGB)
back_pic = cv2.cvtColor(back, cv2.COLOR_GRAY2RGB)
x = self.template_match(slide_pic, back_pic)
# 输出横坐标, 即 滑块在图片上的位置
print(x)
return x

import time
from selenium import webdriver
from selenium.webdriver.common.action_chains import ActionChains
driver=webdriver.Chrome(executable_path='chromedriver.exe')
#http://npm.taobao.org/mirrors/chromedriver/
driver.maximize_window()
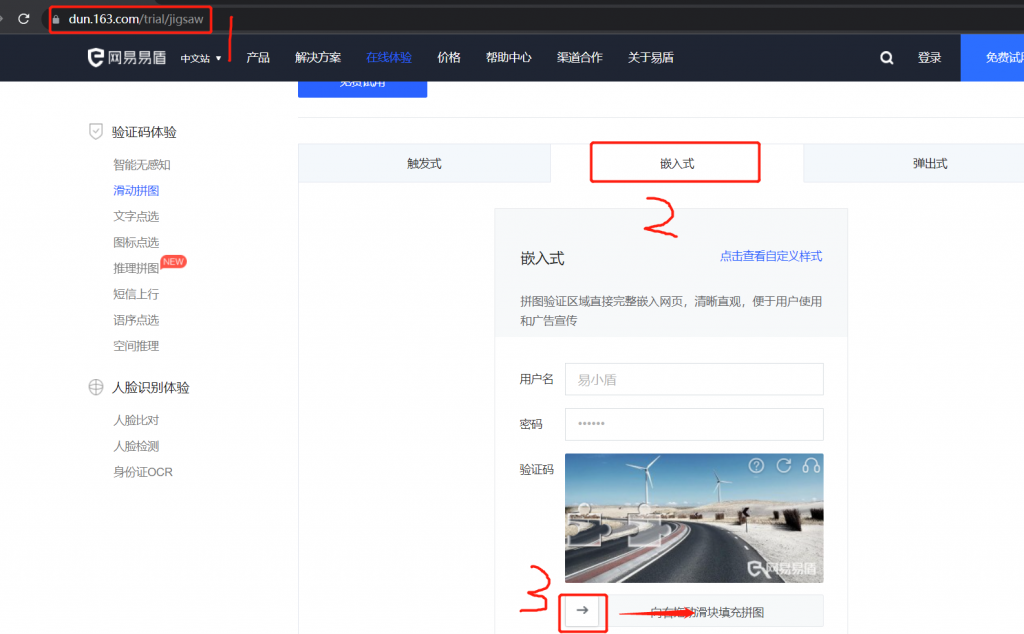
driver.get('https://dun.163.com/trial/jigsaw')
driver.implicitly_wait(10)#最多等待时间
driver.find_element_by_css_selector('[captcha-mode=embed]').click()
time.sleep(1)
tag=driver.find_element_by_css_selector('.yidun_slider')
driver.find_element_by_css_selector('[captcha-mode=embed]').click()
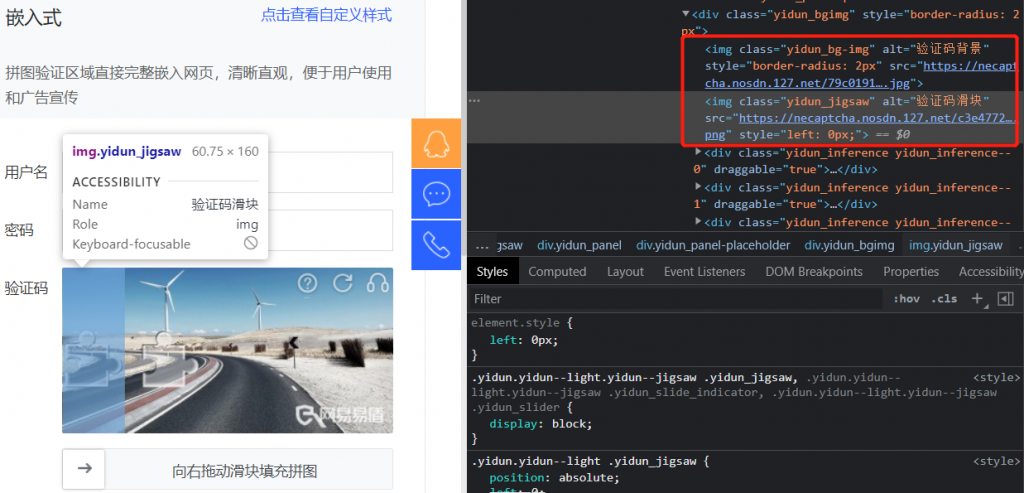
img1_src=driver.find_element_by_css_selector('.yidun_jigsaw').get_attribute('src')
img2_src=driver.find_element_by_css_selector('.yidun_bg-img').get_attribute('src')
print(img1_src)
print(img2_src)
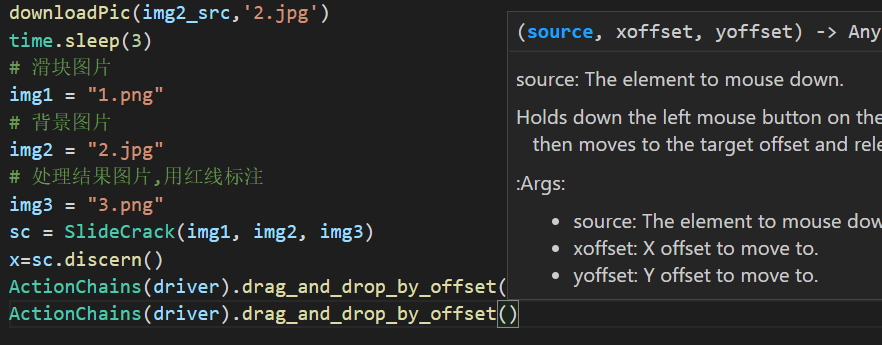
downloadPic(img1_src,'1.png')
downloadPic(img2_src,'2.jpg')
time.sleep(3)
# 滑块图片
img1 = "1.png"
# 背景图片
img2 = "2.jpg"
# 处理结果图片,用红线标注
img3 = "3.png"
sc = SlideCrack(img1, img2, img3)
x=sc.discern()
ActionChains(driver).drag_and_drop_by_offset(tag,x,0).perform()

滑块验证码自动拖拽(selenium+opencv)
https://xinhaojin.github.io/2022/02/22/滑块验证码自动拖拽(seleniumopencv)/
作者
xinhaojin
发布于
2022年2月22日
许可协议